13Disciple | 24-Jan-19
Data was supplied by the WoT Wiki Page and various game mechanics experts from the WoT Discord
Armor models and statistics provided by tanks.gg and wotinspector.com
Armor models and statistics provided by tanks.gg and wotinspector.com
Hull and Module Damage
Hull (armor) damage is distinct and separate from module/crew damage. We covered hull damage in the last article. In this article we will cover module damage. Hitting a module will only damage the hit points of that module, and will not impact hull damage. Hitting the hull and doing damage will not remove the hit points from modules. A single shell can damage both hull armor and modules as a shell will continue traveling past the penetration point inside the tank, possibly doing additional module/crew damage based on that shells 'damage vs. modules', and which modules it hits.
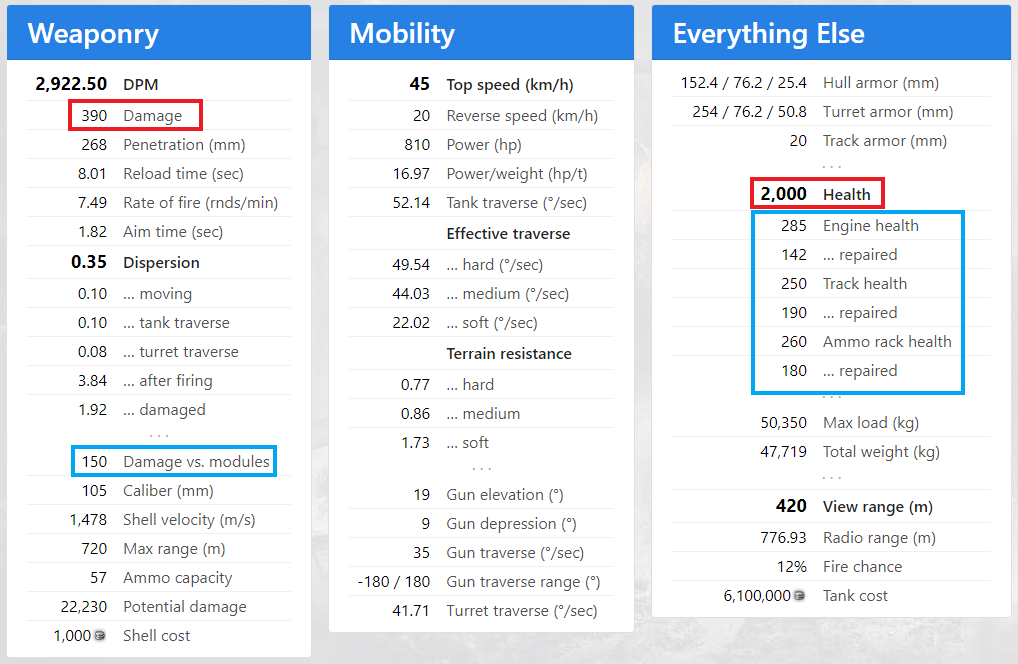
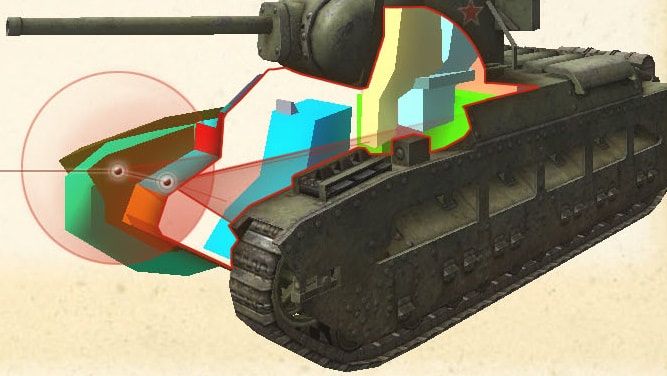
Red is gun damage, and hull health. Blue is module damage and module health.
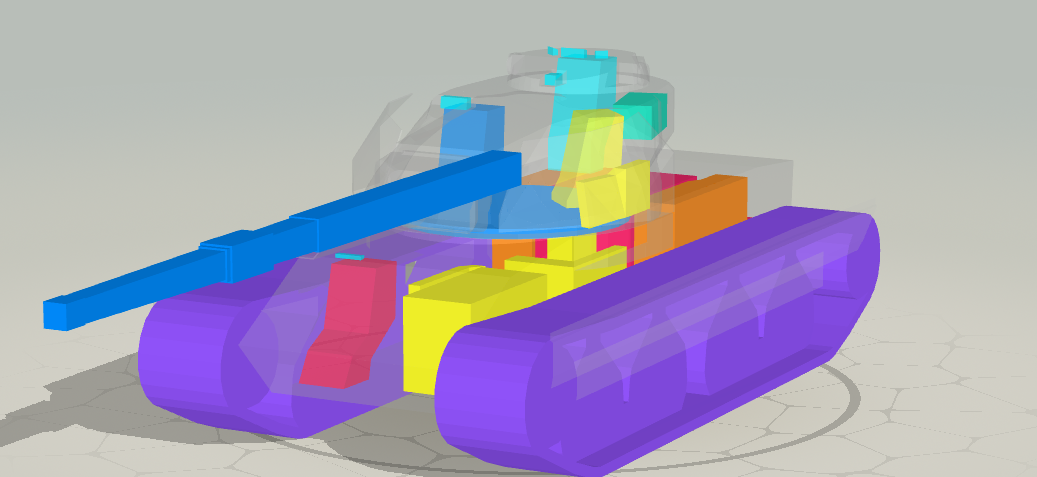
Module Hit Boxes Conqueror
|
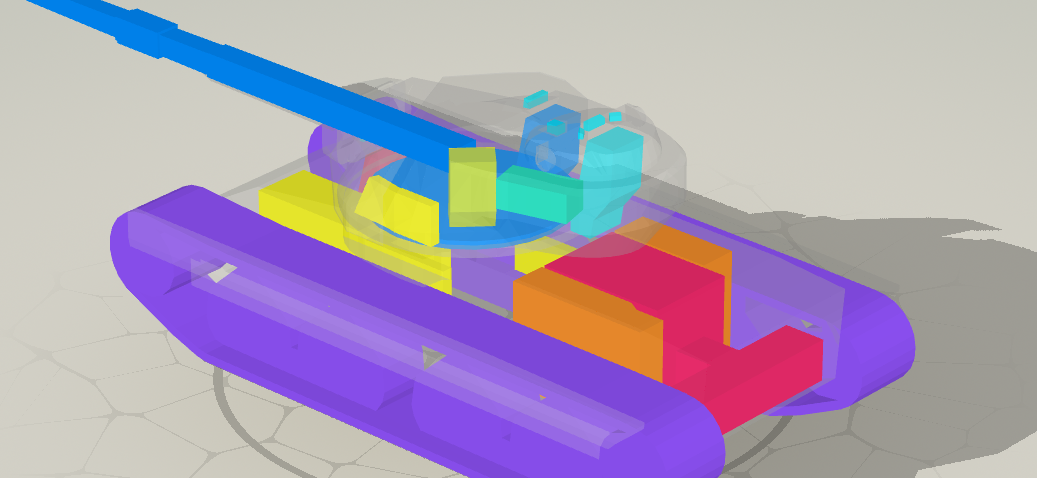
Module Hit Boxes Conqueror
|
Module hit boxes provided by wotinspector.com
Double Penetration Review For Modules (AP/APCR/HEAT)
When an AP and APCR shell does penetrate armor, the shell will continue in the direction it was traveling 10mm for every 1 mm of caliber size (IE a 90 mm shell will continue traveling for 0.9 meters). Lets try to break down the shell's path and it's impact on the tank.
First the shell strikes armor and makes a penetration test following all the penetration rules we have already covered. If the shell successfully penetrates the armor, it continues on the same path. The distance it travels is based on it's caliber size.
In the case of spaced armor the remaining penetration potential is the original RNG value minus the spaced armor that it has already penetrated. It then makes another penetration test on the hull armor with the remaining potential.
Once a shell successfully penetrates the hull the damage RNG is rolled and damage is applied to the tanks overall hull hit points. The shell continues to travel through the tank and may penetrate modules or crew members. All internal modules and crew members have no armor, and any shell that intersects with them will 'penetrate.'
When a shell penetrates a module or crew member a saving throw is cast. If that fails, it's 'damage vs. modules' (highlighted in the blue box above) is RNG rolled and this damage is applied to the module(s) or crew that it hits. The module damage, and the module health is not transparent to players in the game.
Module Damage (HE/HESH/HEP)
When an HE shell strikes an armored plate it tests for penetration as normal. If it penetrates hull armor, the tanks hull hit points suffer damage based on the HE shell's alpha damage. Then the game creates a sphere centered at the point of penetration with a radius based on the blast radius property that particular HE shell has. Trace rays are drawn to each impacted module and saving throws are cast. If the modules fail the saving throw damage is applied to that module based on the shell's 'damage to modules' property.
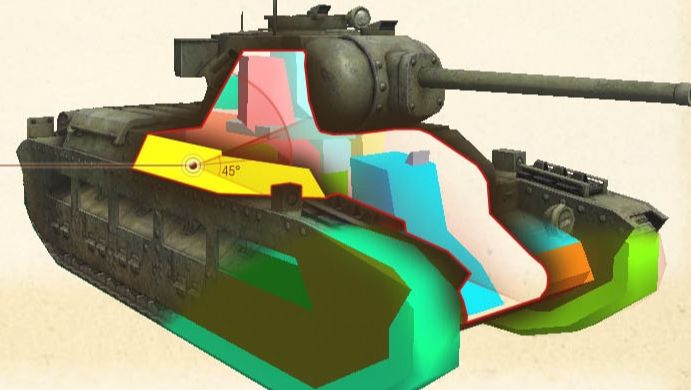
For an HE shell that does not penetrate, in both instances of spaced armor and direct hit non penetrations - there is a trace ray that locates the point at which maximum damage is attained (review the previous guide for further explanation). This trace ray ends where it intersects the hull armor. Centered on that point a new 45° cone is drawn with in the vehicle, and new trace rays are drawn to any impacted modules and a saving throw is tested. If the saving throw fails these modules will suffer damage based on the shell's 'module damage' property, however it is reduced by armor, and distance from initial impact. The game developers have not shared how this math is computed in the game.
Because HE shells create spheres and cones of damage inside of vehicles, they are more likely to hit many modules, and possibly damage multiple modules in a single hit.
HE direct hit - non penetration
|
HE direct hit - spaced armor
|

HE miss - splash damage
|
Saving (RNG) Throw
When a module or crew member is hit, they may not necessarily take damage. There is an RNG check (dice throw) to determine if a crewman or module takes damage. If you play any table top war games think of this as a saving throw. The base odds of damaging crew or modules are in the table below. If the RNG roll passes this 'saving throw' then the module / crew damage is completely mitigated. If this roll fails then the module or crew member suffers the 'module damage' property of the ammunition fired. The damage is also RNG based however the developers haven't shared the math for this. It is believed to follow the normal + or - 25% normal distribution model.
Module/Crew |
Base Chance Damage |
Tracks |
100% |
Observation Device |
45% |
Fuel Tanks |
45% |
Turret Ring |
45% |
Gun |
33% |
Engine |
45% |
Ammunition Rack |
27% |
Crew (hit by AP/APCR/HEAT) |
33% |
Crew (hit by HE) |
10% |
Deadeye Skill:
The base chance can be increased by 3% if the attacking gunner has the Deadeye perk active, and is firing AP, APCR, or HEAT ammunition. Deadeye does not effect HE ammunition, and is a useless skill on tanks that primarily fire HE.
The base chance can be increased by 3% if the attacking gunner has the Deadeye perk active, and is firing AP, APCR, or HEAT ammunition. Deadeye does not effect HE ammunition, and is a useless skill on tanks that primarily fire HE.
Module and Crew Damage Report In Battle
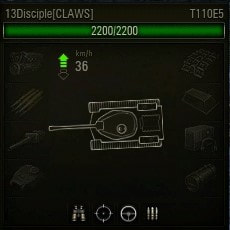
Modules and crew all have their own hit points (just like the hull hit points). These values are not available to be viewed in game, and are hidden statistics for each tank. These values have been mined from the client and can be viewed on various websites such as tanks.gg. We do get a simplified display of the health of these modules in game via the tank health panel.
|
|
The Default color - one with no shading - indicates that the module or crew member has enough health to remain at 100% operational capacity.
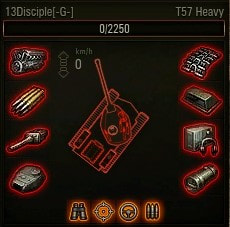
Modules Damaged and Knocked Out
Yellow modules indicate that they have equal to or less HP than their 'repaired' hit points. This is roughly 50% of their remaining hit points. You can check a specific modules 'yellow' state by checking the tanks values in tanks.gg. There is an example shown the image below. Yellow modules may suffer status effects (see tables). Red modules indicate 0 remaining hit points, and your crew will automatically begin to repair red modules to a 'repaired health value' or yellow state over time. The time it takes to repair a module differs by tank, but is modified by primary crew skill, repairs training, tool box equipment, and the passive from the large repair kit.
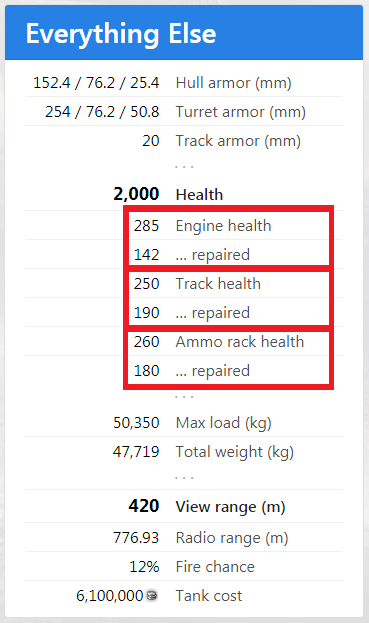
Repaired Health
|
|
|
Ammo Rack Detonation:
When the ammo rack hit points reach 0, the unspent rounds detonate and the vehicle is destroyed in a glorious explosion that usually results in a the turret popping off and flying dramatically through the air. You can improve your ammo rack hit points with wet ammo rack equipment, and/or safe stowage. Remember that these only increase the hit points of your ammo rack and won't improve it's saving throw chances.
When the ammo rack hit points reach 0, the unspent rounds detonate and the vehicle is destroyed in a glorious explosion that usually results in a the turret popping off and flying dramatically through the air. You can improve your ammo rack hit points with wet ammo rack equipment, and/or safe stowage. Remember that these only increase the hit points of your ammo rack and won't improve it's saving throw chances.
Safe Stowage and Wet Ammo Rack:
Safe stowage is a perk that can be learned by the loader. Once at 100% safe stowage provides a bonus 12.5% hit points to your ammo rack (If two loaders in 1 tank learn this skill it is not cumulative). The complex equipment wet ammo rack (class 1 and 2) both increase your ammo rack hit points by 50%. Both wet ammo rack and safe stowage are cumulative for a maximum 62.5% increase in your ammo rack hit points.
This perk, and this equipment do NOT lower your chances at taking ammo rack damage. All it does is improve the hit points. Because of that, the value of the perk has been debated. If the ammo rack on the M48A5 (the above example) is at 260hp, had a crew member with safe stowage it's overall hit points would be 292.5. It is unclear if either 'safe stowage' or 'wet ammo rack' improve hidden 'repaired health' statistic at all. which means that repaired ammo racks may still have the same health regardless of safe stowage.
Example: If the ammo rack of an M48A5 is damaged by another M48A5, safe stowage would not prevent the ammo rack from turning yellow. If we assume the module damage RNG is an exact average roll at 150 hp the safe stowage skill isn't enough to prevent the ammo rack from turning yellow.
With out safe stowage:
260 HP - 150 HP = 110 HP
110 HP < 180 HP - the ammo rack turns yellow
With safe stowage
292.5 HP - 150 HP = 142.5 HP
142.5 HP < 180 HP - the ammo rack turns yellow
It should be noted that the 150 module damage does go through an RNG roll. that means that safe stowage improves the odds that damage to the ammo rack will not turn it yellow - and it will also improve the odds that 2 consecutive hits to the ammo rack will not cause detonation. 110 HP left on an ammo rack means a second hit from an average 150 damage will likely detonate, however at 142.5 HP remaining means that a 150 average damage is less likely to detonate the ammo rack on the next hit.
Repair Kits:
Any tank module can be restored using a repair kit. The small repair kit will only restore a single module and has a 90 second cool down. A large repair kit will restore all modules and also has a 90 second cool down. Large kits also passively provide a 10% bonus to repair speed.
Any tank module can be restored using a repair kit. The small repair kit will only restore a single module and has a 90 second cool down. A large repair kit will restore all modules and also has a 90 second cool down. Large kits also passively provide a 10% bonus to repair speed.
Crew Knocked OutCrew members will never have a yellow state. When a crew member's hit points reach 0, they are knocked out and turn red. The tank performance characteristics are impacted by a crew death. Knocked out crew members essentially perform their primary skill at 0% training level. If a crew member serves multiple roles in the tank, then all vehicle characteristics related to those primary skills are reduced. For example, the commander is responsible for view range. If your commander dies, then his effective skill level at improving view range is removed. The view range of your tank then defaults to it's base stat, plus any modifier like optics. It should be noted that your commander also gives each crew member a small performance bonus when maximized each crew members primary skill performance can be up to 120%. When he dies, his performance increase to those members also goes away bringing each member in their primary skill only 100% performance.
|
|
Crew deaths also impact perks. For instance If the commander dies, you will also lose sixth sense, or if your radio operator dies, you may lose up to 3% view range if they have 100% trained situational awareness.
Shared perks such as Brothers in Arms (BiA) remains active regardless of crew member death.
Med Kits:
The only way to heal crew in your tank is by using a med kit. The small med kit will restore a single crew member and has a 90 second cool down. A large med kit will restore all knocked out crew members and also has a 90 second cool down. Large med kits also passively provide 15% resistance to crew injuries from penetrating hits.
Jack of all Trades:
The commander perk Jack of all Trades means he can replace knocked out crew members. Assuming this skill is trained to 100%, any crew member that is wounded in battle the commander will fill in for. However the commanders effective training in the primary roll will be 50%. Meaning that even with Jack of all trades, knocked out crew members will still perform at 50% of their normal ability. If further crew members are knocked out the commander splits his training between them, so his effective primary skill becomes 25% for both positions. Generally it's better to use kits, and there are more useful skills to train on commanders.
Drowning and Complete Crew Death:
It is entirely possible (but quite rare) for every crew member to be knocked out in your tank while your tank still has hull hit points. You can no longer control your tank, and beyond this point you will be unable to use consumables. Effectively your tank is destroyed even if it still has hit points. Your tank hull can still take damage even after your entire crew has been disabled. Each crew member that is dead/wounded at the end of the match will incur a 10% experience penalty.
Drowning is effectively the same as complete crew death however your crew and your tank will have a penalty applied to their experience for that match. It should be noted that you can damage any tank after it has drowned. This doesn't do anything for you, but it does increase their repair cost to the drowned tank.
Cumulative Crew and Module Status Effects
Module damage and crew deaths are cumulative to tank characteristics. This means the status effects of multiple failures will stack. If I have a tank with a 10 second reload, and that tank suffers a yellow ammo rack damage, it's reload goes to 20 seconds. If that same tank suffers both a damaged ammo rack and a dead loader, it's reload could go as high as 30 seconds (depending on the primary skill training the loader orginally had).
Fire Damage
There are two ways to be set on fire. First you will catch fire immediately after your fuel tank's hit points reach 0. The second is through engine fire. Each time your engine fails a saving throw and takes damage there is a chance it can catch fire. This fire chance is displayed in the garage and differs based on each individual engine. It's worth mentioning that the transmissions are modeled in the tanks, and when they take damage it counts as engine damage, however they will not start fires. The preventative maintenance perk will reduce the odds of an engine fire by 25%. This will stack with the automatic fire extinguisher passive which reduces the chance of fire by 10%.
While your tank is ablaze with fire it will suffer both hull damage, module damage, and crew damage. The base damage of each tick of fire damage differs by tank and is not shown in game. In battle you'll see fire damage as a steady string of numbers rising from a burning tank. As the crew work to contain the fire you'll notice consecutive fire ticks begin to do less damage and slow down. The firefighting skill is available to be trained on each crew member and will reduce the time your tank is on fire, and will reduce the damage from each tick of fire damage.
NOTE: Driving into water will not put out a fire
N̶O̶T̶E̶:̶ ̶D̶r̶i̶v̶i̶n̶g̶ ̶w̶h̶i̶l̶e̶ ̶o̶n̶ ̶f̶i̶r̶e̶ ̶i̶n̶c̶r̶e̶a̶s̶e̶s̶ ̶t̶h̶e̶ ̶e̶x̶t̶i̶n̶g̶u̶i̶s̶h̶i̶n̶g̶ ̶t̶i̶m̶e̶ ̶c̶o̶n̶s̶i̶d̶e̶r̶a̶b̶l̶y̶.̶
(It was confirmed during a developer QnA with NA CC's that this is false, driving while on fire doesn't not increase extinguishing time)
You can immediately stop a fire by using a manual fire extinguisher consumable, or if you have an automatic extinguisher equipped it will automatically activate 0.5 seconds after your tank is lit on fire.


